OK So I've been drawn down the rabbit-hole of the mystery of Somerton Man (the Tamam Shud case). A summary can, of course, be found on Wikipedia: https://en.wikipedia.org/wiki/Tamam_Shud_case
Among all the amazing elements and aspects of this story, I've been intrigued by the controversy around the 'Rubaiyat of Omar Khayyam'. Very briefly, the phrase 'Tamam Shud' was found on a small piece of people rolled and placed in a fob pocket in the body's trousers discovered on 1 December 1948 on a beach. Six months after the body was found, and after a great deal of attention in the press, a chemist from Somerton handed in a copy of the book with that final phrase in the book torn out. On the back of the book was written a 'code' or 'cipher', and one or more (usually stated as two) phone numbers. One of these numbers led to a woman who it is believed knew the identity of the main.
There is a significant amount of discussion on blogs and in the media around the cipher (never been deciphered), and the phone number or phone numbers. A lot of image analysis has taken place on the code photos, and suggested espionage-related features such as 'micro writing' buried in the markings, and the phone numbers being written.
As the book is now misplaced, it is not available for analysis. My reading of conspiracy theories and over-analysis led me to take a step back and ask: what do the early newspaper reports reveal, and what can we learn from the photos reported in the media? There are a lot of qualifications and assumptions, but I decided to look at the articles from the perspective of them being based on information shared by police with reporters.
So what can we learn? In chronological order... and I've bolded important facts I'd like to highlight.
The first article (Sat 23rd July) shows the book the torn-out paper on the last page of the poem. This photo is posted less than 24 hours after it was handed in, and I think it's reasonable to assume it's legitimate. Note that the article (less then 24 hours!) notes both the coded words, and phone numbers, written in pencil:
News (Adelaide, SA : 1923 - 1954) Sat 23 Jul 1949:


Last night an Adelaide businessman read of the search in "The News" and recalled that in November he had found a copy of the book which had been thrown on the back seat of his car while it was parked in Jetty road, Glenelg.
The book, the last page of which is torn, has been handed to police.
If scientific tests, to be conducted next week, show the scrap of paper found on the dead man's clothing had been taken from the book, police will have brought off a million-to-one chance.
The finder of the book today handed it to Det.-Sgt. R. L. Leane. On the last page the words "Taman Shud" had been torn out.
On the back of the book are several telephone numbers and a series of capital letters, written in pencil, the meaning of which have not yet been deciphered. As the scrap of paper found on the dead man had been trimmed, police were unable to identify the book merely by fitting it into the torn page. Proof will now rest with tests on the paper and the print.
The next article (Mon 25th July) shows the book in a Melbourne paper, with a slightly different field of view. It appears to be a different photograph from the one above, but reinforces the tear shape and location where "Tamam Shud" was removed from the last page.
The Herald (Melbourne, Vic. : 1861 - 1954) Mon 25 Jul 1949

The Advertiser (Adelaide, SA : 1931 - 1954) Mon 25 Jul 1949
New Clue In Somerton Body Mystery
A new lead to the identity of the Somerton body may have been discovered on Saturday when Det. Sgt. R. L. Leane received from a city business man a torn copy of Fitzgerald's translation of the Rubaiyat of Omar Khayyam said to have been found in his car at Glenelg about last November, a week or two before the body was found.
Scrawled in pencilled block letters on the back of the cover of the book are groups of letters which appear to be foreign words and some numbers. These, it is hoped, may be of assistance in tracing the dead man's identity.
OK on the Tuesday, the Adelaide papers show a photo of the front cover of the book. We know this is the correct edition, published by the NZ firm Whitcombe and Tombs. It has been suggested this photo is not from the copy found in the car, but this photo is definitely of the found copy - it looks a little beaten and bent, but this statement reinforces that the only copy police have is that found in the car: "All efforts yesterday to obtain a similar copy of the book from city book shops failed" - there is only one book available to photograph. One other point here. The article points out the pencilling was very light, and "police managed to read it by using ultra-violet light". This is important for the next section:
News (Adelaide, SA : 1923 - 1954) Tue 26 Jul 1949

Body Mystery Deepens Phone number found on cover of book
The Somerton body mystery deepened today with the discovery of an Adelaide-woman's telephone number on the cover of a book linked with the case.
Police, have discovered also that the woman gave a similar copy of the book to an Army lieutenant in Sydney about three and a half years ago, and that the lieutenant later tried to contact her in Melbourne, when she wrote back saying she was now married.
Police have also discovered that the Somerton body was found within a quarter of a mile of the woman's home.
Det.-Sgt. R. L. Leane yesterday obtained the opinion of an authority that the piece of paper bearing the words "Tamam Shud" was of the same texture and color as that of the book handed to police on Saturday.
The book had been thrown into the back seat of a motor car in Jetty road, Glenelg, shortly before the victim's body was found on the beach at Somerton on December 1.
Woman's story
All efforts yesterday to obtain a similar copy of the book from city book shops failed. If police could obtain a similar copy, they would be able to check on the print used in the words "Tamam Shud.”
The woman whose telephone number appears in pencil on the cover of the book told police that when she was nursing at North Shore hospital in Syd ney about three and a half years ago, she gave a similar copy to a lieutenant who served
In the Water Trafsport section of the Army.
Later, she said, the lieutenant wrote to her mother's home in Melbourne. She replied to his
letter, telling him she was married. Subsequently, the woman told police, she and her husband settled in Adelaide. Last year a man called at the house of a neighbor, inquiring for a nurse he once knew.
Acting on the possibility that the "Rubalyat" in their possession did belong to the lieutenant, police set out to decipher a number of block letters pencilled on the back of the book. Although the lettering was faint, police managed to read it by using ultra-violet light.
The next article here (with no photographs) is important mainly because it reinforces that TWO phone numbers were written on the back of the book. There is no mention that these books were hidden or obscured, among or under the large block letters:
Police Test Book For Somerton Body Clue
Microscopic tests of a slip of paper found in the clothing of the unknown man known as the "Somerton body," and the book from which the slip is believed to have been taken, yesterday established that the slip could have come from the book —a copy of Omar Khayyam’s "Rubaiyat.'"
The paper in the book and that of the slip were found to be similar. Detectives hand ling the case will now concentrate on tracing another edition of the book to compare the words "Taman Shud" meaning "The End") with those on the slip found in the possession of the dead man.
Yesterday the police interviewed two suburban telephone subscribers whose numbers corresponded with those on the back of the book, but they knew nothing of the matter.
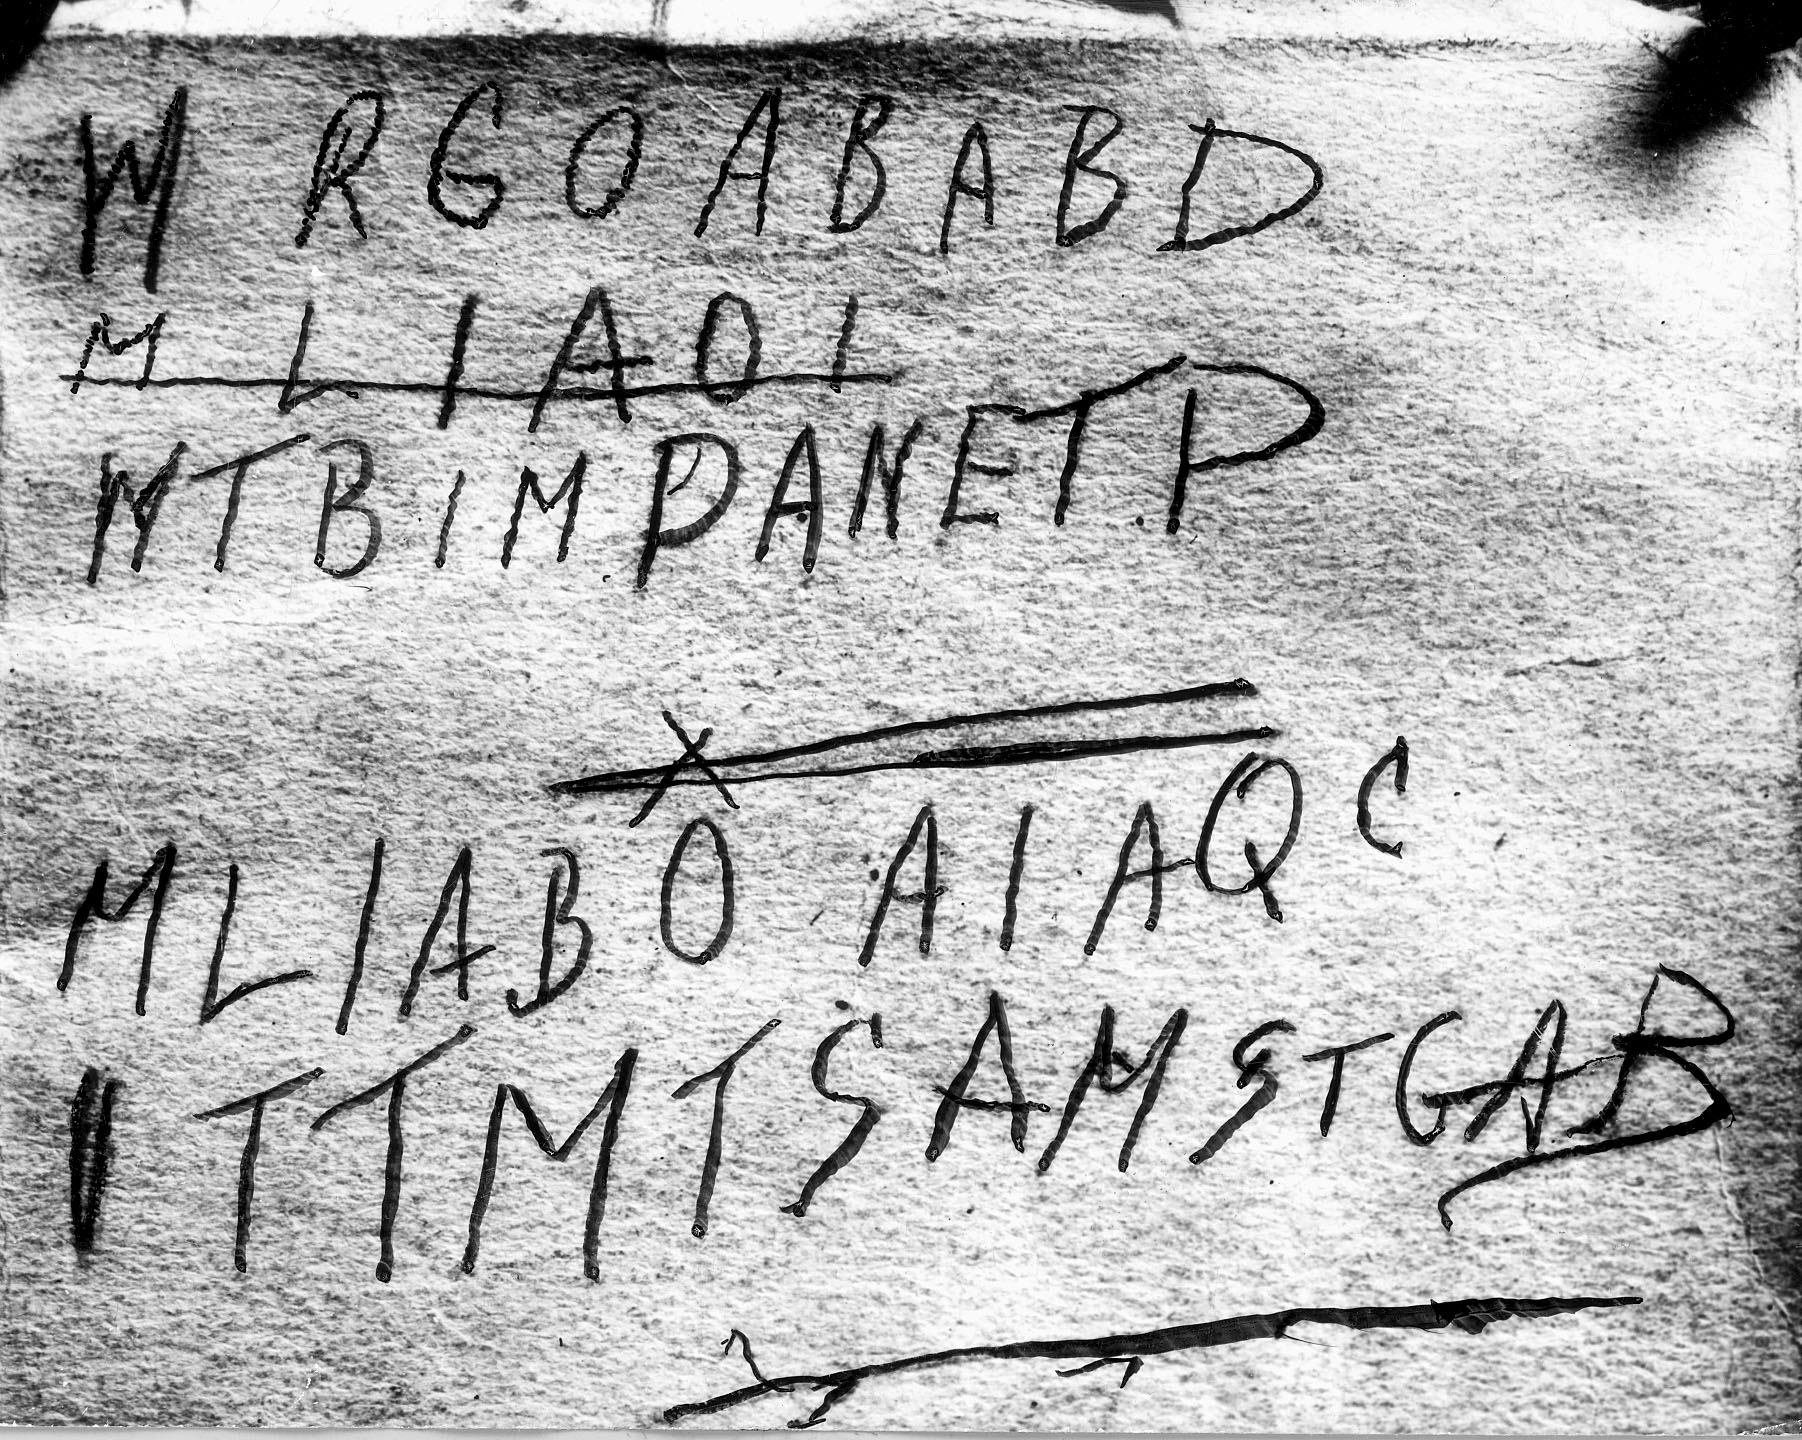
OK so let's look at the code. This was revealed in articles, but the first photographic image of the rear cover of the Rubaiyat was published in Adelaide in 1949. This photo is distinct from the high-resolution image that is available and examined on most web sites and blogs. Given how faint the pencilling was, it seems likely that the photograph was traced over with a darker marker and re-photographer (and hopefully not directly written on to the book (!). Looking closely, traces of light pencil can be observed under some letters:
The Advertiser (Adelaide, SA : 1931 - 1954) Mon 29 Aug 1949

This Beat The Navy Can you decipher these rows of letters?
Police believe they might be a coded message, but Naval intelligence men have failed to decipher them. The letters appear on the back cover of a copy of the “Rubaiyat" found in a motor car at Glenelg last year. Police have established the book was once in the possession of the unknown man who was found dead on the beach at Somerton last December.
Several other images of the back cover, likely all from the same photograph and different from that above, are available. These are all shown below. The first two are from the National Archives of Australia files from the Stuart Littlemore 'Inside Story' ABC program on Somerton Man. The third is from Derek Abbott's wiki, and he indicated to me it was sourced from a newspaper archive:
NAA: C673, INSIDE STORY PART 1 Page 155 of 197

NAA: C673, INSIDE STORY PART 1 Page 196 of 197

The below image is from Derek Abbott’s wiki

Finally, I've pulled in three pieces of the transcript of the interview between Stuart Littlemore, and Superintendent Brown who had worked on the Somerton Man case. The text is largely NOT part of the televised interview, and while not providing detail, it confirms two phone numbers. The explanation of why phone numbers were not deeply followed up are not very satisfactory:
NAA: C673, INSIDE STORY PART 2 Page 40 of 177
Interview with Supt Brown


My thoughts
The photos of the torn page, and of the cover of the book, are legitimate. The cover is shown because police would like to find an identical copy - clearly they could only photograph the discarded copy.
Furthermore, it is made clear that the code letters are in pencil, and that it is suggested an ultraviolet light was needed to view them. Given this, they would be unlikely to photograph easily. As such, the black wiring is likely over-written by police photographers in order to create the image. Any image analysis of this black writing is likely studying an artifact of black marker. This is perhaps reinforced by looking at the upper-left letter were it appears the being lettering underneath can be seen.
It is unfortunate that the wider view image of the entire back cover is not available at higher resolution, where some marginalia may appear.
Where are the phone numbers?
OK so we can see the cipher. WHERE ARE THE PHONE NUMBERS?
In the 1949 newspaper photograph of the book, the text can be seen to the right and below the 'P' on the second line of code text. I've circled it below. If the numbers are there, they should be visible on the high-quality image right?? Well yes, but looking closely, it appears to have been blocked over with either a square of paper, or a copy-paste of a block of blank paper from elsewhere in the image.
This is really exciting to me. All I am prepared to say of the text is that I clearly see an 'X' (the start of telephone phone numbers), the number '3?39', and underneath I believe I can read the name 'JESS'. According to other sources and sites, the number should be X3239, as that is the Thomson number listed in the Adelaide directory.

This analysis may exist somewhere out there, but I haven't found it. I think this simple explanation de-mystifies the understanding of these numbers and how they were noted on the rear cover. Not hidden, but written in plain sight for the owner of the book to be able to refer to them.
WHAT DO YOU THINK?
Good post Matt. Not sure whether you have read the information from Det Supt Brown, he was quite clear on how the number was written "The phone number was in very tiny lettering. Len stated that the phone number was written under the code." Worth following up on the wiki from Adelaide Uni:https://www.eleceng.adelaide.edu.au/personal/dabbott/wiki/index.php/Leonard_Douglas_Brown
ReplyDeleteA few points:
1. According to Gerry Feltus, the 'pencil markings' were indentations left by pencil markings.
2. The letter Q amongst others has relatively clear letters and numbers just beneath the surface that can be 'lifted' using a standard forensic technique to show a sequence. You might care to take a closer look at the rounded upper of first letter P in line 3.
3. The method used to create the code in this way was developed in 1943? by British Intelligence, SOE, the clandestine communication method being known as 'INK H' whereby a letter would be written in ink first, then a pencil was used to write within the letter (micro code) and then a final layer was optionally added to cover the appearance of the smaller writing. The standard method to 'develop' the hidden code was to immerse the paper containing the writings into a strong household bleach. This took away the ink but left the the pencil marks.
4. In the case of the code page what was left behind were the indentations of both the pen and the pencil markings and it was those that the Police or whoever wrote over using, I think, a very small brush and a particular kind of fluid which I don't think was an ink.
Hope this helps,
Gordon
Hi there; I read with great interest your assessment of the code, and I can see very clearly that there are other letters buried within the more prominent ones.
ReplyDeleteI have tried to find more information on the particular technique to which you referred, but can find nothing unfortunately. Can you give any links on the subject? Thanks!
Dennis
Matt, you say the pic of the Rubaiyat (above) is the real one. How did you come by this information?
ReplyDeleteSorry for the delay!! Can you be more clear on where i say it's "real" - i found the image using the National Library of Australia digitized newspaper archives, to read all the articles in the first few days/weeks of the case. Keeping in mind that at first this was really an unidentified corpse, it makes sense that information would be shared with media in order to try and seek help. I believe the photos are authentic - there is no reason to think otherwise.
DeleteEarth to Matt .... come in Matt.
ReplyDelete